Astrophotography image processing is extensively covered in numerous excellent web sites, some of which are referenced below. I won’t attempt to duplicate that material, rather I will simply describe the process I use, with illustrations.
You ask, why is post-processing necessary for astronomy images? There are several reasons, both technical and esthetic, such as:
- Raw captured images have a very large dynamic range with faint details that usually cannot be viewed or printed without contrast compression.
- The imaging process generally involves combining a number of sub-exposures that must be graded, normalized, color balanced, registered and combined.
- Most combined images benefit from sharpening.
- Images may be processed to emphasize different regions of the object such as bright galaxy central regions vs faint arms. These different views can be combined in an HDR like process to enhance the final image.
- Results from sessions over several nights may be combined to yield longer effective exposure times.
- Finally, since captured imaged colors are altered by filtration, color balancing and colorization can be varied to suit the imagers preference. For instance, H-alpha emissions or bright star forming regions might be emphasized.
Summary of imaging process steps.
- Image capture
- Bayer conversion to create color images from Raw files
- Normalization
- Grading
- Registration
- Combining
- Digital stretching
- Color balance
- Sharpening
- Other processing
Star sizing or removal
Background neutralization
Cropping
Resizing
Software I Use
There are numerous applications for image processing. These are the ones I use.
- ASIAIR app functions for image capture and live stacking
- The ASIAir app allows the user to perform all capture operations as well as provides live view stacking to allow the user to watch the process in real time.
- Saves the final stacked image for reference.
- ImagesPlus for normalization through Combing, Stretching and Sharpening
- this is legacy image processing software. V6.5 is free; however, development is frozen. Works on Win 11.
- IP is very comprehensive, with a unique processing interface.
- Astro Pixel Processor for everything except final steps such as advanced sharpening, cropping, resizing, HDR and color operations.
- This Windows app is a recent addition to the group of astro imaging packages.
- Processing can be automatic or manual .
- AP is reasonably priced rent or buy, with a free trial.
- It has complex UI that needs a learning curve.
- AP also provides advanced tools such as Digital Stretching, star sizing and star removal.
- Adobe Photoshop
- Comprehensive general imaging processing
- Cropping
- Color balance and processing
- Sharpening
- Layering and HDR
- Sharpening
- Various web-based apps
- Windows stand-along apps
Detailed Descriptions
Image Capture
Image capture in my system is performed by the ASIAir controller. There are several available capture modes – Preview for single images, Live capture to create a stacked image on the fly as well as save individual raw frames, Run to continuously capture images and Plan to setup multi-object captures as a series of events. Video is also available. Most of the time I use the Live mode to be able to monitor the imaging progress in real time. Live capture steps are as follows:
- After selecting the object and performing a GoTo and checking the focus, perform a Preview capture to review the exposure. The Histogram should be well away from the histogram left dark side. Set the exposure so the background is not too bright. With the ASI183, set the gain to M or about 100 and exposure to 60 to 300 seconds. On the preview frame, the stars should be nice and round with no trailing. If the stars appear elongated, check the alignment and guiding.
If the stars are OK, proceed to acquire images. - Settings:
- Tracking – on
- Gain – 100
- Exposure time – 60 to 300 sec
- Guiding on – with default settings
- Use Live stacking
- Total exposure time – depends on sky conditions, scope F/ number, and object brightness.
- Star clusters total from 30 min to 1 hour.
- DSO objects – At least 2 or more hours at F/2 or 4+ hours at F/5.
- After the object frames or Lights are acquired, shoot the Dark frames at the same setting as the Lights. Shoot the Flats at a convenient exposure. Bias may be optionally skipped for cooled astro cameras. If suitable Master frames are available these steps may be skipped.
- At the end of the session, save a copy of the stack for reference as a JPEG, TIFF or PNG. Then download the Raw files in fits format for processing.

Example image M51 before cropping.
ASIAir Live stacked image 57 x 5min = 4.75 hrs., semi-clear sky, poor transparency. Carbonstar150 with 0.67 reducer 989mm FL @ F/5. No other processing.
Auto Processing in Astro Pixel Processor (AP)
Most of the initial processing with AP is automatic, once the images have been loaded. Steps are:
- Load Lights, Flats and Darks. Be sure to select RGB and Session number, if multiple exposure groups are to be used for the object.
This process assumes a one-shot color camera that captures all of the colors at the same time as contrasted with a monochrome camera that requires multiple exposures through filters to capture colors. The one-shot color cameras have a matrix of four pixels, each sensitive to a different color, usually in a RGGB pattern, that is one red, two greens and one blue pixel in a square array. This called a Bayer pattern.
The file format generally used is FIT or FITS file type that must be processed to create the properly colored pixels (de-Bayered). In Astro Pixel, this is the first step, hence the selection of RGB in the settings.
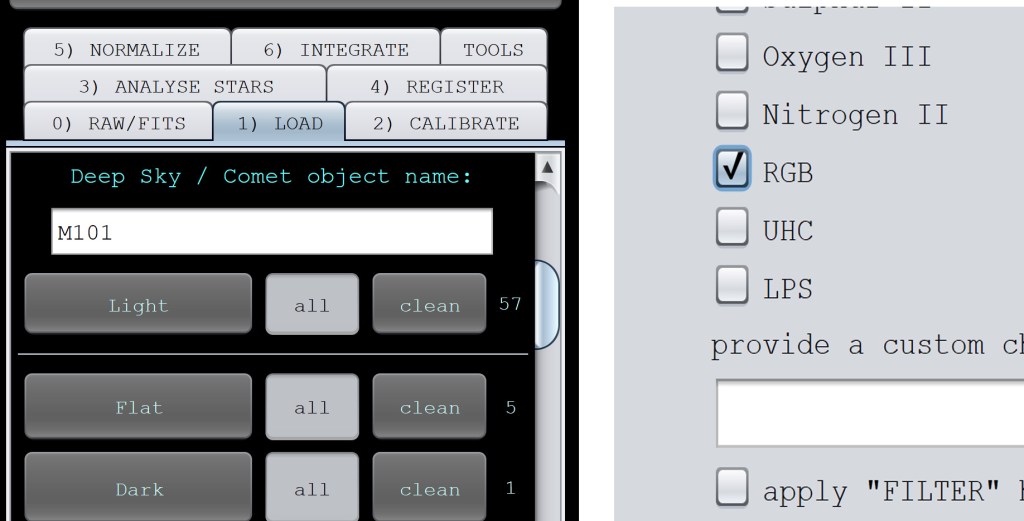
Load Lights and set RGB
- Select Integrate from menu and start the automatic integration process.
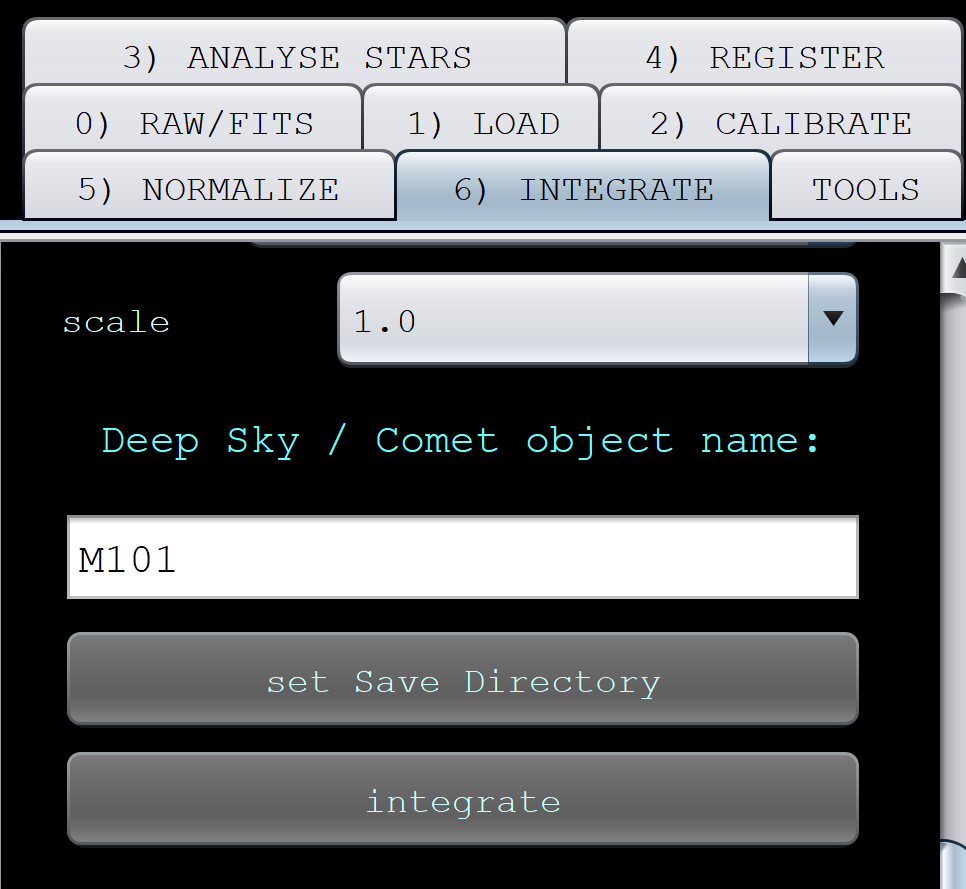
- AP will step through creating color pixels, evaluating the individual frames, normalizing each frame with Flats and Darks, Registering the frames and finally Integrating (combining) the frames.
- If the user preference is to perform the processing steps manually, simply select a step and start that action.
- If, after a processing step, there are individual frames that do not meet the quality requirements set for that step, those frames will be flagged or rejected. Each frame is also assigned a quality index.
- If the process has succeeded with no errors, the combined image is passed to the Digital Stretch module.
- If there are individual frames with low scores or rejected frames, go to the list of frames and remove those frames and repeat the Integration process. Failure or low scores could arise for a number of reasons:
- Tracking lost resulting in star trails.
- Passing clouds result in few or no stars.
- Registration failure because of poor image conditions for one or more frames.
- Once a suitable final image is created, it it time to move to the Digital Stretch function.
AP Digital Stretching
Stretching or digital contrast enhancement is very complex. It is advisable to review some of the available on-line tutorials and videos on the subject. Some practice will be necessary to get good results. At this point I manipulate the images adjustment parameters to yield an images with these characteristics:
- Black background
- Sufficient object dark area differentiation from the general background.
- Good detail in both the highlight and dark areas.
- Good overall color balance. – no pronounced color casts.
- Minimal over saturated pixels (those at lightness levels at limit).
- Good gradation in the midtones.
In AP, the topmost three sliders, labeled B for black level, W for white level and G for gamma are the most useful in making final adjustments. I set these as follows:
- Adjust B to set the background (BG) to black, but only enough so the dark areas of the subject are still differentiated from the BG.
- Then adjust G to change the gamma or contrast function to give a good balance of highlights and shadows.
- Repeat B and G adjustments until the image is acceptable, since these settings interact.
- Make these adjustments in very small steps to get to the final result.
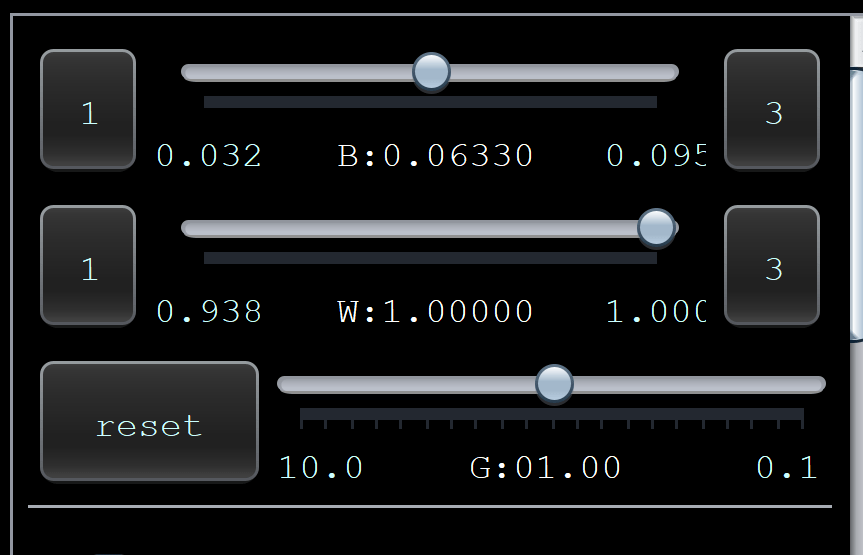
Image adjustment sliders.
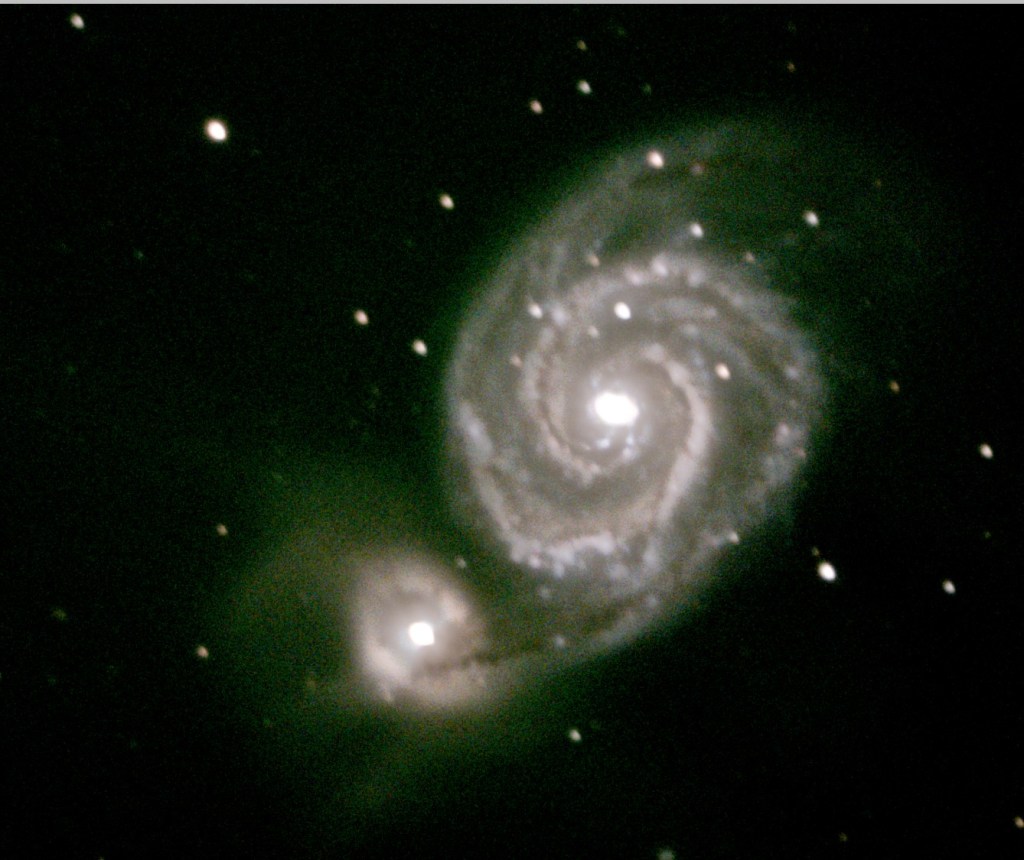
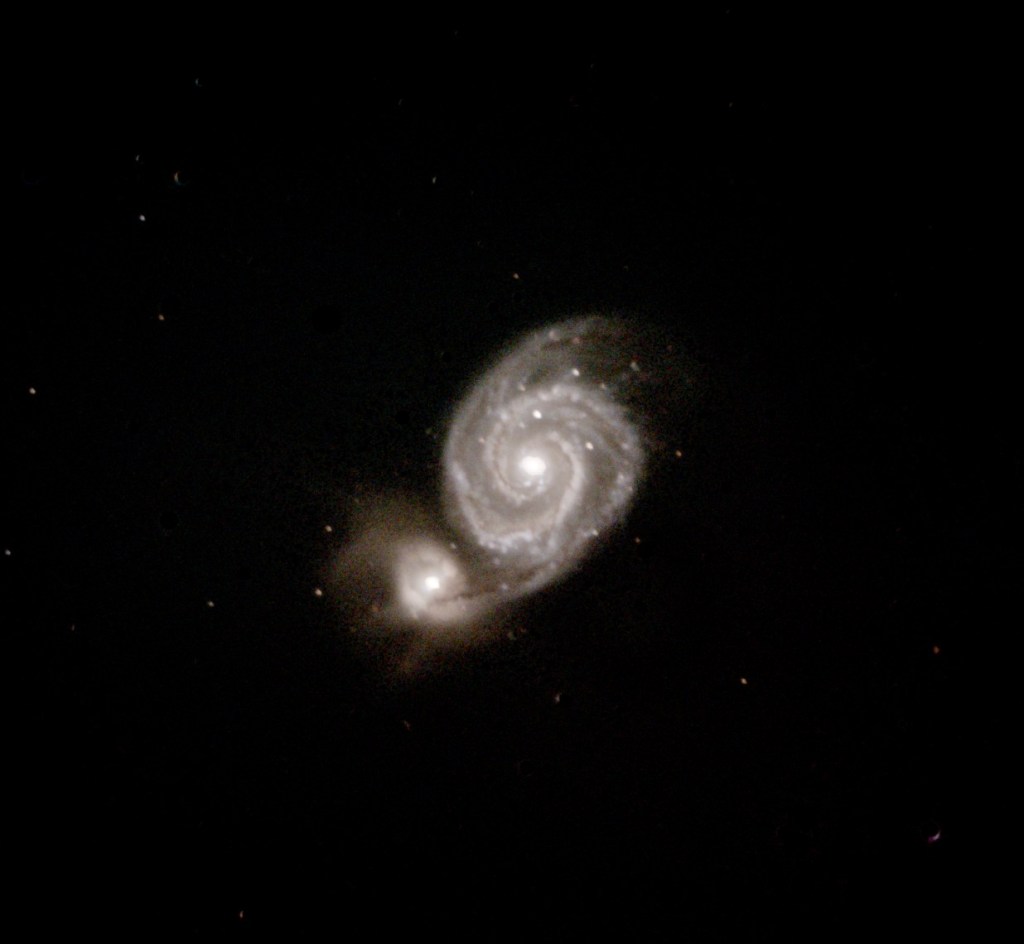
M51 27x3min exposures. Semi-clear with poor transparency
Auto processed in AP with DDP auto stretch
Below the main image adjustment sliders are various other adjustments, including image saturation (Sat), contrast (Con) and sharpening (Sharp).
In my experience, these astro-photo images usually benefit from some degree of sharpening. The example shown was acquired in poor conditions – thin clouds and poor seeing. The resulting image frames were thus not as good as if conditions were favorable. The Bortle rating for that night was probably 8 or 9, that is bright sky BG and not many visible stars. (This example was selected for illustration to demonstrate that even in light polluted conditions, interesting images can be acquired.)
Sharpening the final image enhanced the details, especially in the bright arms of the galaxy.

M51
Add sharpening using the Sharp slider.
The appearance of the final image is somewhat subjective and depends on the photographer’s intent. Suit yourself, or consult some of the “official” images from HST or other profession sources as a guide.
Other AP processing.
Under the Tools menu, there are useful functions such as star size reductions or removal. Sometimes, foreground stars may interfere with the visual impact of the image. This tool allows the user to alter the star size, brightness or to even remove stars by size. This tool should be used carefully in order to preserve the character of the final image.
The image can also be cropped or resized as needed using the Tools menu crop item.
M51
Other AP tools – Star removal
As a last step in AP, save the image as a JPEG to use at once or as a TIFF for additional post processing.
Adobe Photoshop
Final post processing in Photoshop can enhance the processed image by selectively enhancing portions of the image such as galaxy central cores or star forming regions. Color balance may be improved and additional sharpening may be applied.
Multiple sessions or images variations with selective processing may be combined using layers to enhance certain regions. Again, this is a complex process and the user should review the available tutorials.
Finally, the image can be cropped and resized before saving.
When satisfied the user should save the Photoshop file in PSD format and as a Copy in JPEG or PNG.
Final Sharpening
While the previous tools offer sharpening functions, sometimes more aggressive sharpening is appropriate. This should be done cautiously to avoid un-natural appearing results. There are both Windows-based specialty sharpening tools and web based unblur applications. I have tried both and each produces different results. The final choice is up to the user. A couple I have tried are Unblur Image AI and ArtGuru Unblur Image on the web and AstroSharp for the PC. The user should investigate what works best for them.
Conclusion
To get the most from your astro photos, some post processing is necessary. A variety of software tools is available and several of the tools can be used together to produce the final image. The primary example used here was processed in Astro Pixel Processor. An example from poor seeing conditions was used to demonstrate that reasonable results can be obtained even in light polluted conditions,
